ShopDreamUp AI ArtDreamUp
Deviation Actions
So I was asked to do a tutorial on hatching. I use it alot in my comics and art as I LOVE the energy and gritty feeling cross hatching can portray in artwork. But there are guys and gals out there that do it way better than I can. So I'm going to do a tutorial on some of the basics, and then encourage you to look at the art of Wally Wood, Joe Kubert, Walter Simonson, and Marc Silvestri to see how the masters use it.
So lets get going
For those of you young artists who grew up in the digital age. Hatching is a technique that was developed back when printing processes were very limited. Not that I'm that old, but when I was reading comics as a kid, they didn't have the technology to print full color beautifully rendered artwork with all the fancy gradients and special effects you see in comics now. Both the technology to make the art like that cheaply and quickly didn't exist, but even if it did, the technology to print it cheaply didn't exist either. So artists had to develop techniques to give the illusion of gradients and shading without actually having it. Thus Hatching was born.
Just for historical accuracy hatching didn't come about when I was a kid, it's a technique hundreds of years old all the way back when printing was first invented. Woodblock, pen and ink, or etchings, hatching was the way to create gray shades without actually using gray.
The idea is based on the idea of optical illusions. If you closely space together black lines they mix with the white space between them, and create the optical illusion of gray. The closer those black lines are together the darker the gray (because there is less white in between them). The farther apart the black lines, the lighter the gray (because there is more white to mix with the black.)
The key though is to be uniform and deliberate with the lines. Any haphazard use will flatten or just out right ruin your drawing. So lets look at some examples.

So obviously this isn't any cross hatching. This is just shades of gray to show a sphere. But sometimes you don't have the option for all these grays. So you have to show it with just a black line. There are many many different techniques. I'll show some here. You can mix and match at will, They key is to find the technique that works with your drawing style, as each hatching technique is not interchangeable with each drawing style.
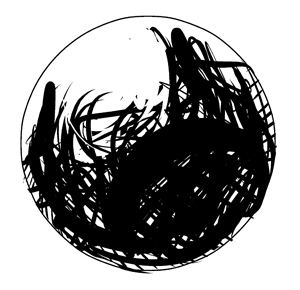
Don't just throw lines around. Hatching ≠ messy. Hatching ≠ random lines in every direction. Remember its an illusion to show gray. The lines have to be purposeful. Closer together where you want a darker gray. Farther apart where you want lighter. And most importantly it has to follow the shape of the object. I kept it simple with a ball here. If you do not follow the form of whatever it is your hatching it will end up making your art look more 2D flat than 3D with shading.
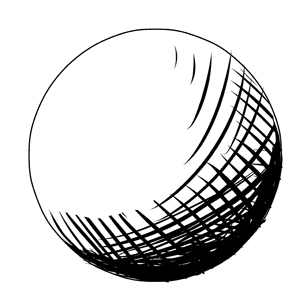
This is the most basic of cross hatching. Notice how the hatching curves with the shape of the ball. Also notice how the hatching crosses where i want it to be darker. And the hatching gets closer and closer together until its just plain black at the bottom. If you squint your eyes, you'll see how this creates the illusion of a shadow gradient across the ball.
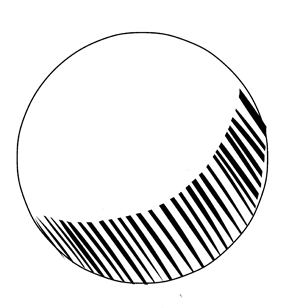
Another basic hatching technique. You'll see this alot in wood block prints, but naturally it can be used in ink drawings as well. You'll notice how all the lines are straight and parallel to each other, and do not curve with the shape of the ball. However the starting and ending points of these lines create the curved shape needed to portray that the hatchings are the shading on a round ball.
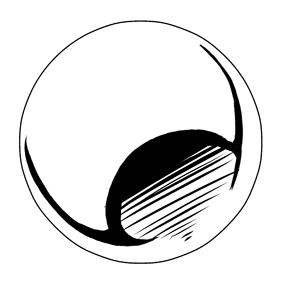
This hatching technique is used quite a bit modern comics. The principal of this technique is to draw the core shadow first. The line that separates the light from the shadow. This line will be the part that follows the form of whatever your hatching. Once you have that core shadows drawn use parallel line to hatch how dark the shadow is. I recommend that the lines should be closer together near the core shadow line. Thinner and more far apart as you get farther away from that line.

This one is also used quite a bit in modern comics. The idea behind this one is to use parallel lines coming out from the main core shadow. As you see in the example above the lines feathering out from the shadow gives the illusion that the shadows is getting lighter as it gets farther away from that core. Since you'll probably use mostly parallel lines on this type of hatching you'll really have to rely on your core shadows properly following the form, or risk flattening it. (Though you are not limited to parallel lines. As I said earlier your free to mix and match. Whatever works best for your drawing style.)
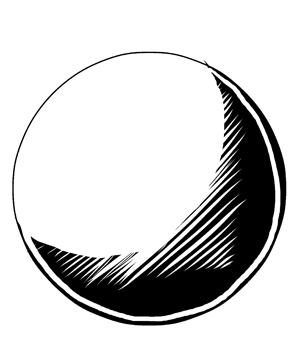
This is the same as some of the above techniques. But instead of relying on your drawing each line in black ink, you can draw the main shadow in black, then go back in with white ink (or white pencil tool if you're doing this digitally) and draw the hatchings into the black form. The negative space it creates will create that illusion of gray your going for.

I'm going to be honest. I'm not great at this technique, and I rarely use it in my art. The idea is to use a repeating pattern of lines instead of intersecting lines to create that illusion of gray. I highly recomend you check out Kenneth Rocafort if you want to see an artist use this technique masterfully.
So that's my tutorial on hatching. Like I said at the begining, now that you read this tutorial, go look at some masters of the media and check out how they implemented these techniques I just talked about. Then go practice it yourself. If you struggle with it at first, it's okay, it's something you have to get used to. Mostly because real life objects don't have crossing lines where the shadows are. But the more you practice the more it'll become second nature to you, then you'll be cross hatching like crazy! (but don't cross hatch too much, we don't want your art to look all messy. Moderation and control is key.)
I guess i should also say that cross hatching isn't something you have to do in your art. If you like clean sharp lines with no spot blacks or cross hatching shadows that's fine. Like I said, hatching does not fit all art styles. But if this drawing technique interests you, then have at it! You have nothing to lose!
Finally, if there is something you'd like me to do a tutorial on because you can't really find it around the web, then let me know! I'm trying to do tutorials on things that are hard to find. (So don't ask me to do a hand tutorial, there are a million of them out there, There is nothing I can say that's any different than the current ones). So send me an email, or just leave a comment, and I'll add it to the list of tutorials.
In the mean time check me out around the web:
Like me on Facebook
Follow me on Twitter
Re-blog me on tumblr
And if you love my artwork don't forget to pick up my comics!
And remember: Make Comics! Not Excuses!
So lets get going
For those of you young artists who grew up in the digital age. Hatching is a technique that was developed back when printing processes were very limited. Not that I'm that old, but when I was reading comics as a kid, they didn't have the technology to print full color beautifully rendered artwork with all the fancy gradients and special effects you see in comics now. Both the technology to make the art like that cheaply and quickly didn't exist, but even if it did, the technology to print it cheaply didn't exist either. So artists had to develop techniques to give the illusion of gradients and shading without actually having it. Thus Hatching was born.
Just for historical accuracy hatching didn't come about when I was a kid, it's a technique hundreds of years old all the way back when printing was first invented. Woodblock, pen and ink, or etchings, hatching was the way to create gray shades without actually using gray.
The idea is based on the idea of optical illusions. If you closely space together black lines they mix with the white space between them, and create the optical illusion of gray. The closer those black lines are together the darker the gray (because there is less white in between them). The farther apart the black lines, the lighter the gray (because there is more white to mix with the black.)
The key though is to be uniform and deliberate with the lines. Any haphazard use will flatten or just out right ruin your drawing. So lets look at some examples.

So obviously this isn't any cross hatching. This is just shades of gray to show a sphere. But sometimes you don't have the option for all these grays. So you have to show it with just a black line. There are many many different techniques. I'll show some here. You can mix and match at will, They key is to find the technique that works with your drawing style, as each hatching technique is not interchangeable with each drawing style.
DON'T

Don't just throw lines around. Hatching ≠ messy. Hatching ≠ random lines in every direction. Remember its an illusion to show gray. The lines have to be purposeful. Closer together where you want a darker gray. Farther apart where you want lighter. And most importantly it has to follow the shape of the object. I kept it simple with a ball here. If you do not follow the form of whatever it is your hatching it will end up making your art look more 2D flat than 3D with shading.
Basic Cross Hatch

This is the most basic of cross hatching. Notice how the hatching curves with the shape of the ball. Also notice how the hatching crosses where i want it to be darker. And the hatching gets closer and closer together until its just plain black at the bottom. If you squint your eyes, you'll see how this creates the illusion of a shadow gradient across the ball.
Parallel Hatching

Another basic hatching technique. You'll see this alot in wood block prints, but naturally it can be used in ink drawings as well. You'll notice how all the lines are straight and parallel to each other, and do not curve with the shape of the ball. However the starting and ending points of these lines create the curved shape needed to portray that the hatchings are the shading on a round ball.
Classic Comic hatching

This hatching technique is used quite a bit modern comics. The principal of this technique is to draw the core shadow first. The line that separates the light from the shadow. This line will be the part that follows the form of whatever your hatching. Once you have that core shadows drawn use parallel line to hatch how dark the shadow is. I recommend that the lines should be closer together near the core shadow line. Thinner and more far apart as you get farther away from that line.
Feathering

This one is also used quite a bit in modern comics. The idea behind this one is to use parallel lines coming out from the main core shadow. As you see in the example above the lines feathering out from the shadow gives the illusion that the shadows is getting lighter as it gets farther away from that core. Since you'll probably use mostly parallel lines on this type of hatching you'll really have to rely on your core shadows properly following the form, or risk flattening it. (Though you are not limited to parallel lines. As I said earlier your free to mix and match. Whatever works best for your drawing style.)
Negative Feathering/Hatching

This is the same as some of the above techniques. But instead of relying on your drawing each line in black ink, you can draw the main shadow in black, then go back in with white ink (or white pencil tool if you're doing this digitally) and draw the hatchings into the black form. The negative space it creates will create that illusion of gray your going for.
Patterned Hatch

I'm going to be honest. I'm not great at this technique, and I rarely use it in my art. The idea is to use a repeating pattern of lines instead of intersecting lines to create that illusion of gray. I highly recomend you check out Kenneth Rocafort if you want to see an artist use this technique masterfully.
Done
So that's my tutorial on hatching. Like I said at the begining, now that you read this tutorial, go look at some masters of the media and check out how they implemented these techniques I just talked about. Then go practice it yourself. If you struggle with it at first, it's okay, it's something you have to get used to. Mostly because real life objects don't have crossing lines where the shadows are. But the more you practice the more it'll become second nature to you, then you'll be cross hatching like crazy! (but don't cross hatch too much, we don't want your art to look all messy. Moderation and control is key.)
I guess i should also say that cross hatching isn't something you have to do in your art. If you like clean sharp lines with no spot blacks or cross hatching shadows that's fine. Like I said, hatching does not fit all art styles. But if this drawing technique interests you, then have at it! You have nothing to lose!
Finally, if there is something you'd like me to do a tutorial on because you can't really find it around the web, then let me know! I'm trying to do tutorials on things that are hard to find. (So don't ask me to do a hand tutorial, there are a million of them out there, There is nothing I can say that's any different than the current ones). So send me an email, or just leave a comment, and I'll add it to the list of tutorials.
In the mean time check me out around the web:
Like me on Facebook
Follow me on Twitter
Re-blog me on tumblr
And if you love my artwork don't forget to pick up my comics!
And remember: Make Comics! Not Excuses!
2024 Commissions are OPEN!
My Commissions are Open! I'm opening 10 slots to start! Send me a note If you are interested! Patreon Supporter -- Inking... @Redstuff10 @JazzySongBird Patreon Supporter @MirrorKhaos @Redstuff10 @Redstuff10 @Msmith322 OPEN OPEN THE DETAILS Prices: HEAD/BUST: Black and White = $40 Full Color = $60 HALF BODY: Black and White = $70 Full Color = $90 FULL BODY: Black and White = $100 Full Color = $120 OTHER STUFF: Additional characters and backgrounds are extra. Consult the images above for exact pricing. All art will be created digitally and delivered via email unless requested otherwise. Art requested to be sent via snail mail will be charged shipping. Shipping pricing varies on where you are in the world. Payments are accepted through Paypal. I must receive payment before you get on the list. The list is formed in order of payments received and I work on commissions in that order. I am opening only 10 slots for this round of commissions. These commissions are for
Emergency Commissions CLOSED
Thank you thank you thank you thank you thank you to everyone who stepped up to help me get the car repair bill paid. I can't say thank you enough. Especially to my patrons who took the bulk of the slots. Commission priority does go to my Patrons, so if you want to make sure you're first on the list next time I open commissions, maybe consider joining my Patreon: http://patreon.com/shadowsofoblivion Now I gotta get to work to fulfill all these orders! Hey, don't you love it when your won't start, and it's not a simple dead battery, but a whole electrical thing? What? no? me neither. But that happened to me this week. So I need to open commissions to pay for the repairs. So here we go! I'm opening 10 slots. I hope that'll get the bills paid: Patreon Supporter -- COMPLETE Patreon Supporter -- COMPLETE Patreon Supporter -- COMPLETE @tyvadi -- COMPLETE Patreon Supporter -- COMPLETE @Varcel -- Sketeched waiting for approval... Patreon
$14 Tees!
Hey Everyone! If you want some $14 t-shirts with my artwork on them nows a good time to visit my Threadless Shop. All my T-Shirts are just $14 until October 16th. So if you want some cool shirts and want to support my work, go over and pick yourself up a shirt! https://thegreatshono.threadless.com/ Here are some shirt examples:
$13 T-Shirts!
Hey Everyone! If you want some inexpensive T-shirts with my artwork on them nows a good time to visit my Threadless Shop. All my T-Shirts are just $13 until Sept. 29th. So if you want some cool shirts and want to support my work, go over and pick yourself up a shirt! https://thegreatshono.threadless.com/
© 2012 - 2024 Shono
Comments17
Join the community to add your comment. Already a deviant? Log In
this is nice here...i was born in 1990s i wasn't a comic fan....id rather not talk about how i was...
But I think digital is a another medium,doesn't make it easy and quick,just more options to ease up abit.
but sometimes flash animators out there,kinda make it look like something traditional legends would bash away before trying themselves.
anyway i like this tutorial...it seems somewhat useful for comic shading ..for what i mean in example..the classic comic shading ball
would be in my point of view,suitable for metal armor ,or maybe feathering hatching for leather ..
when it comes to coloring metal...i have frustration and cant find a tutorial for it plain and simple..but ill work on that problem soon.